How to create unique visitors ID badges: A complete guide
Is your facility receiving visitors each day? How do you allow access only to authorized people? And how do you make your visitors recognizable? It’s quite easy. You can do it by offering them visitors' passes.
At Proxyclick, we have helped thousands of companies design their badges and learned a few things along the way. We thought it would be a good idea to share a few of these things here, including how to make badges.
The tips you’ll find below are universal, but the majority of examples and screenshots here come from Proxyclick's ecosystem because we know it the best.
What are visitor badges?
Badges are commonly used in business and educational environments, such as schools, to easily identify visitors. In some organizations (especially with high levels of security), even the employees are obligated to wear badges at all times. It all depends on the company policy.
Visitor ID badges can be valid for a specific period of time, or used just for a single visit, and serve as a great security measure that’ll prevent unwanted visitors from entering the building. It is also a critical way that companies can ensure that everyone who enters the building has a health-screening to prevent the spread of COVID.
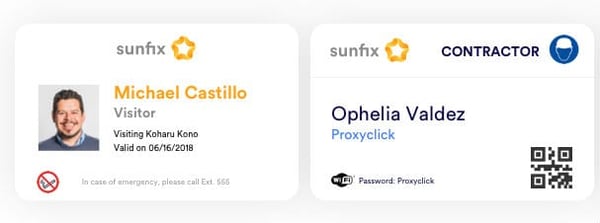
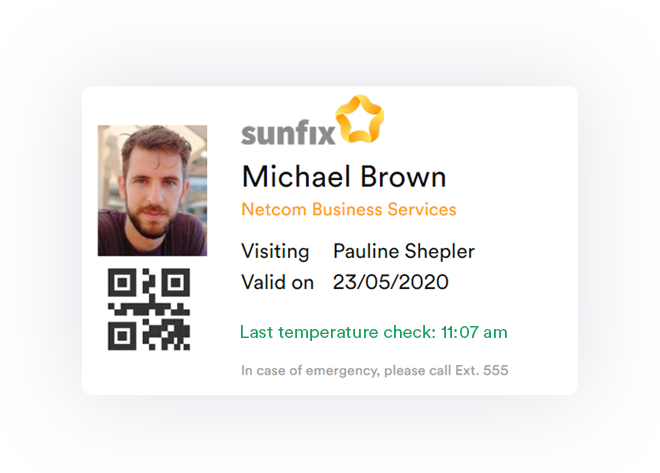
A regular badge contains the first and last name of the visitor. Additionally, a visitor passes template can include the name of the host, company name, a picture, a date of the visit, validity code, QR code, health and security icons, visitor type labels, or a wifi code.
Here are two pictures of badges to serve as examples:
What are the benefits of offering badges to your visitors?
For security reasons, your visitors may be obliged to wear name tags at all times.
If there’s no singular entrance and exit point (with an entry gate) it’s quite easy for a stranger to pass through the reception unnoticed. However, if they don’t wear a badge, they’ll be easily spotted by the security staff or other office workers.
By providing your guests with badges, you always know who is who - especially if the visitor’s picture is printed on the badge. And if someone is walking around without a visitor access badge, they probably didn’t check-in at the entrance and shouldn’t be in the building.
Adding a validity date to the badge is also important. It will prevent visitors from using the badge they received in the past to enter the building at another time.
Visitor badges can be easily falsified, so for additional security, you can make them unique by adding a QR code through the dashboard of a visitor management system. Only after scanning the QR code at the reception will the visitor be allowed to pass.
Most IT experts agree that this mix of physical and digital measures is needed for optimal security. In one survey of over 1000 IT and security professionals, 97% stated that for physical security to be effective, it must be integrated with digital security.
Visitors' passes in the pandemic era
2020 saw an increased need for physical security with COVID-19. It became more important than ever that businesses check each visitor and employee to make sure they are safe.
Regular temperature checks and the ability to do contract tracing if there is a positive COVID-19 result will help ensure that the virus is not spread in the office.
Building a professional image of your company
Printing out badges at the reception enables you to make a great impression on your visitors. The badge may contain the colors and logo of your company, as well as other useful information.
Many of our clients include a guest Wi-Fi code and the name of the host on the badge, to make the visit as smooth as possible. As visitor management expert Lee Odess stated:
[When choosing a visitor management system], incorporate both security and security-theater, as they are essential. Keep in mind not to confuse one for the other. - Lee Odess, CEO of Inside Access Control and Inside Visitor Management
The right badge will strike a balance of both secure and practical, which will encourage adherence. It will also maintain a professional image that shows company concern for safety as well as an emphasis on organization.

A badge with a guest wifi code.
Pro tip: Getting the badges printed automatically as soon as the visitor checks in is a fantastic way to create a modern image of your company.
Integrating the badges with a visitor management system
Badges used to be created manually at the reception. There was a simple template on which the receptionist would write the name of each visitor. But this method is now outdated for several reasons:
- It slows down the check-in process.
- It's error prone (who has never had their name misspelled?)
- It doesn't look professional.
- It doesn't allow adding lots of information on the badge.
But with a visitor management system, the badge is printed automatically, and can display much more useful information. This is a huge time saver both for the receptionist and the guest.
Pro tip: If you’re using an AirPrint printer, you can connect it through Wi-Fi directly with the iPad kiosk to get the badges printed. No cable required!
Combining badges with an Access Control System (ACS)
Depending on size and industry, certain companies rely on an ACS to grant different levels of access to their employees and visitors. By using our badge editor, you can add a QR code to each badge, so that visitors can use the code as a token to check-in and check-out much faster.
Learn more about how Proxyclick integrates with your ACS.
Pro tip: The QR code printed on the badge can define access rights, based on the type of the visitor checking-in.
How to make custom badges for your visitors?
Creating unique badges for your visitors will definitely make your company stand out.
Just imagine - each person visiting your company automatically receiving a beautiful, fully-branded ID badge. If you can make it beautiful enough, the visitor may keep it or even show it to their colleagues.
So how about creating one right now?
The whole process is actually quite easy, and it doesn’t require advanced graphic design skills. All you need for starters is an online badge editor like the one you can find in Proxyclick’s settings.
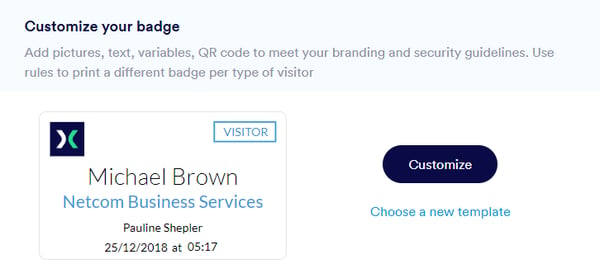
You can choose the most basic template and work from there, or you may select from other available options.
Your badges may have a horizontal or vertical orientation and be black and white or colorful. It all depends on your needs.
Pro tip: Around 75% of the badges are printed in a “landscape” format. The other 25% belong to the “vertical” category. It all depends on your needs, but you can usually squeeze in more information using the horizontal design. It also allows the use of larger fonts, which makes the name visible even from a few meters.
Once you have your template ready, you can use a badge editor. For the purpose of this article, we’ll use the Proxyclick editor:
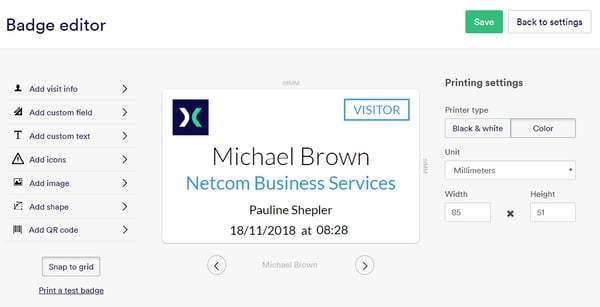
The editor is intuitive and easy to use.
Now the only thing you have to do is put the right information together. You can select and add different types of data from the drop-down menu.
Pro tip: In Proxyclick’s badge editor, you can add a unique visit QR code that will be printed automatically on the badge when the visitor checks in.
Which types of information should be included on the badge?
- First and last name of the visitor
- Your company's logo
- A custom text labeling the person as a “visitor”, “contractor”, “interviewee” etc.
- The name of the host
- Date and time of the check-in
- Temperature scan information
If you want to go beyond the basics, you can include:
- Your company’s guest Wi-Fi code
- Your visitor’s photo
- A QR code which can be used for a fast check-in and check-out
- Additional icons such as “no camera”, “no smoking”
- Number to call in case of emergency
Here's a helpful video on how to add unique messages to your visitor badges with Proxyclick.
Pro tip: “Dynamic” information, such as the date and time of the visit will be automatically pulled from the visitor’s list in the dashboard.
Creating different badge designs for different types of visitors
Again, with a help of a visitor management system, you can identify different types of visitors at the reception (for example - a contractor, an interviewee, or a client). You can set up the system so that it will print a different type of badge for each type of visitor.
Pro tip: In Proxyclick’s badge editor, you can show or hide different elements based on the type of a visitor.
Here’s how it works:
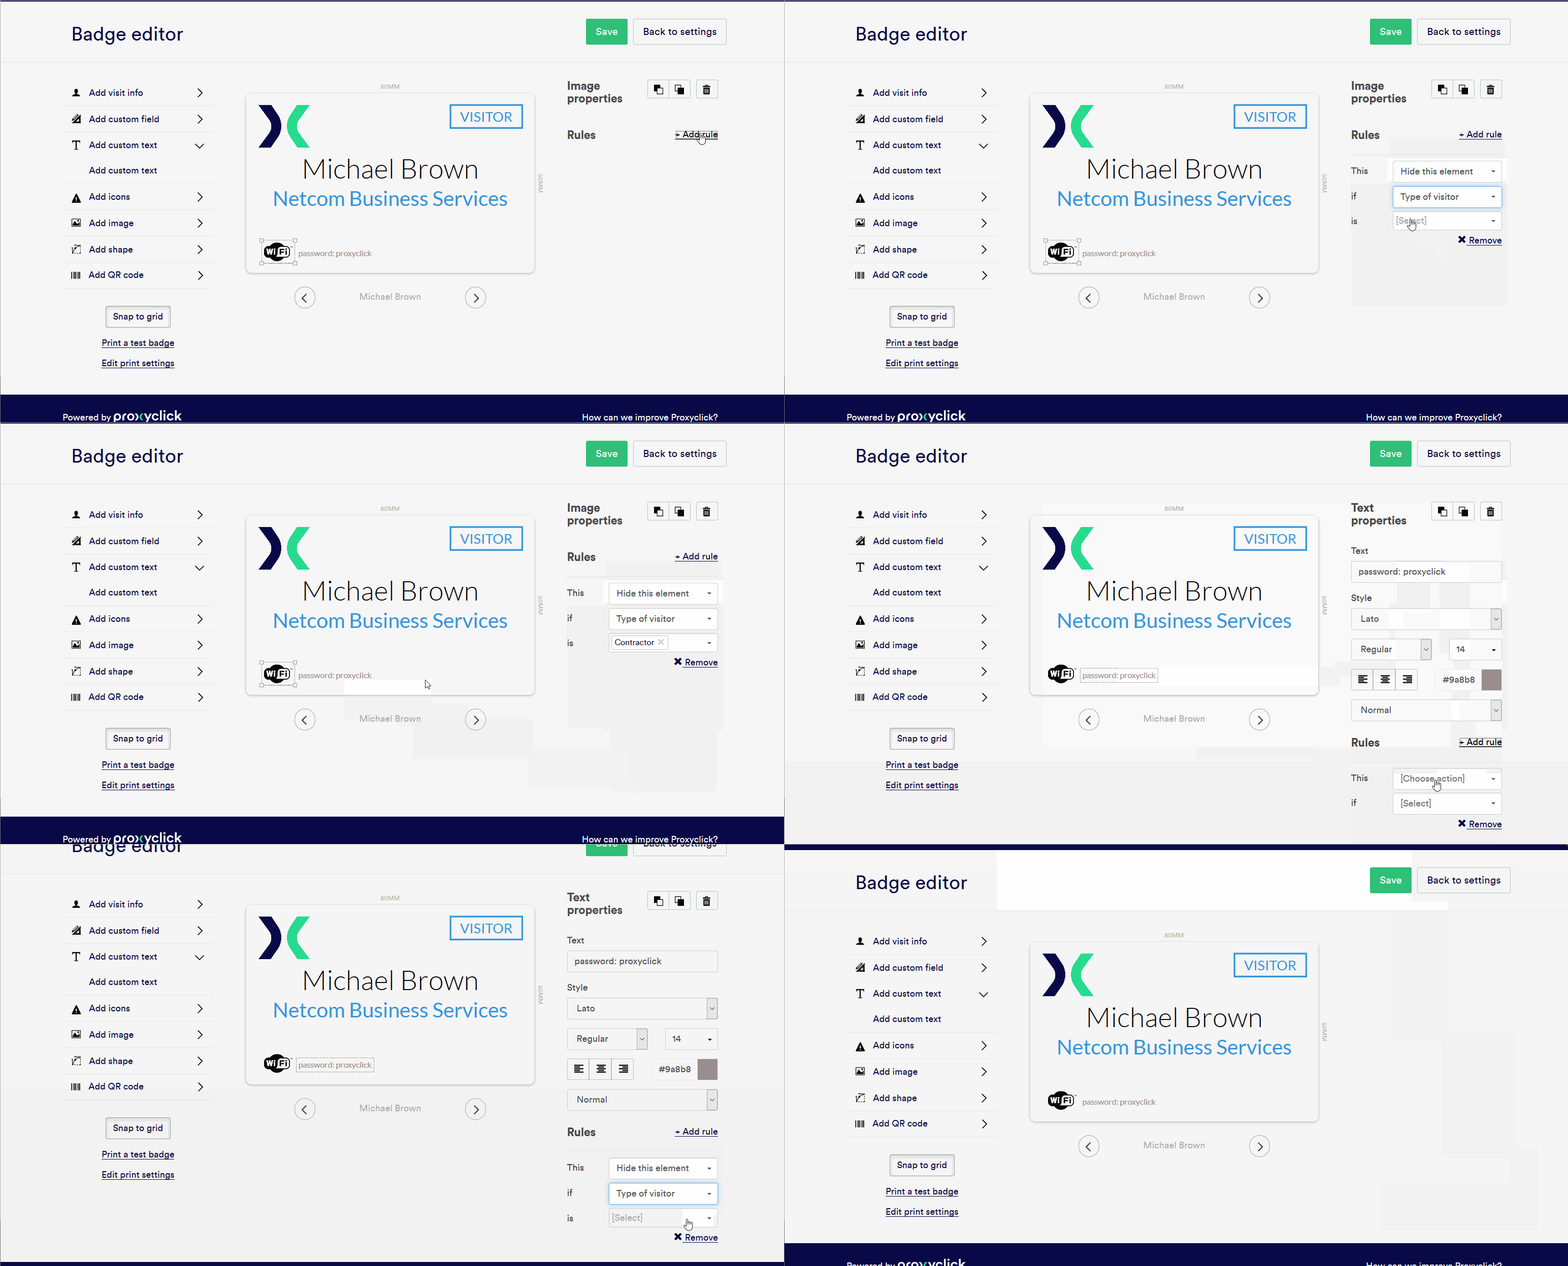
You can quickly add rules in the badge editor and show
or hide different elements according to the type of the visitor.

You can easily print a different type of badge
depending on the type of the visitor.
5 quick badge-design tips:
- Keep the colors consistent with your brand’s visual style guide.
- Don’t use more than two or three colors. Keep it simple.
- Provide enough space for all the necessary elements (you don’t want your visitor’s long name to be cut-off).
- Use a font that will match the overall design.
- Keep the background white to provide a clean look, and let your images pop (and use less ink).
Here are a few examples of nice visitor passes created from these basic templates:

Pro tip: In the online editor, you can print a “test badge” to make sure everything is going to work when your visitors arrive. You can also print the badges in advance from the logbook app, and get them prepared before each visit. This is a great, time-saving feature which will come in handy especially for group visits.
Additional accessories you can use:
You can print the badges on adhesive paper. In this case, the visitor can easily place it on their attire. Using this kind of material, however, does not always create a really professional look, and adhesive badges are prone to being lost.
Moreover, manufacturers are reluctant to sell badges with strong adhesives because this could make visitors unhappy if they get their expensive clothing damaged by the glue.
That’s why there are a couple of nice accessories you should consider if you want your badges to stand out. Using them will need a bit of additional work, but the end result is well worth the effort:
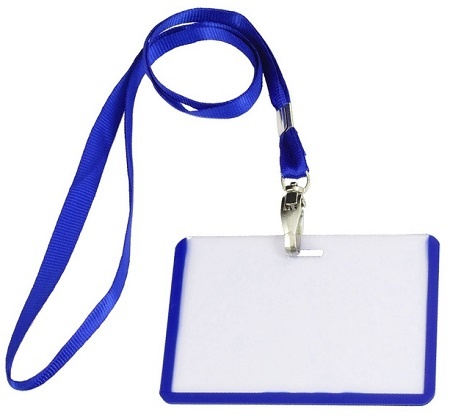
Use a lanyard
Lanyards are fantastic if you want to reinforce your brand and add more convenience to your visitor’s experience. If you order them in bulk, they should cost around $1 per piece - even if they’re branded. Of course, you can pay more (up to $10) for a higher-quality product with additional features and better design.
Use printable, time-expiring badges
These badges are printed with an Inkjet or a direct thermal printer, and are usually valid just for one day. After 24 hours, a big, red “void” mark appears on the badge. This is possible because of slow release of red ink from the badge which has multiple layers.
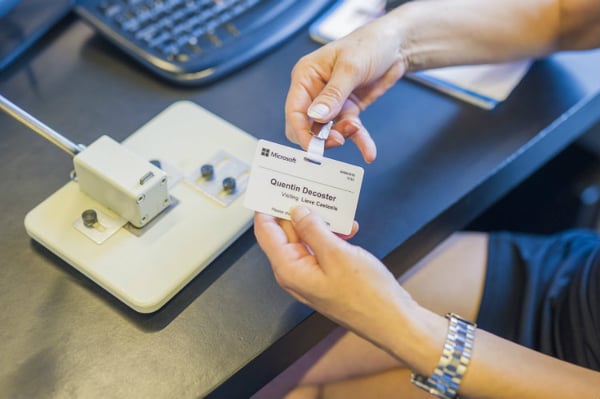
Use the badge hole-punch tool
If you’re using plastic to print out badges, this tool (which costs around $10-$20) is going to be really useful. Simply punch a hole in the badge and complement it with a small clip.
Here’s an example:
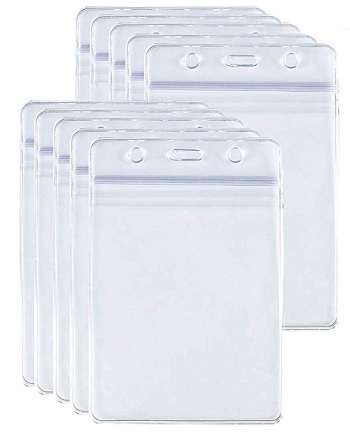
Use a badge holder
Badge holders are quite inexpensive (around 50 cents for a pack of 10), but they can really make a difference. By using the attached clip, the badge will be secure and won’t get lost so easily. They come in different sizes, so make sure you pick the one that’ll be a perfect fit.
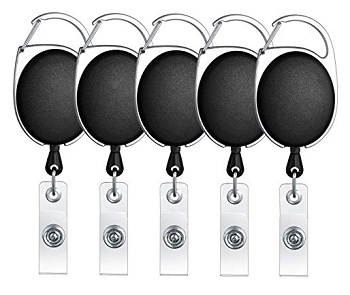
Use a badge reel
When it comes to badge reels, you can choose from hundreds of creative designs. Shop around and pick the one that will make for a great business gadget, which your visitors will keep long after their visit.
Now it’s your turn to prepare professional-looking badges for your guests
Giving badges for your guests is a great thing you can do to keep your office safe, and create a well-organized working environment.
Your visitors will appreciate getting the badges automatically, and the hosts will be grateful that they can easily recognize who’s in the building and what’s their purpose on the premises.
To learn more about how all of the above features work, book a call with one of our experts today.


